Aerogels – Slimline Acoustic Treatment?

Aerogels

The manufacturers of aerogels have hailed it as a space age material that is super light and yet posseses superior thermal and acoustic absorption properties compared to acoustic foam. When we first found out about aerogels we too were impressed by the said capabilities of this wonder material. We were intrigued and wondered if this was the future of studio acoustics and acoustic treatment.

A Cabot sales representative of one of the companies that makes the aerogels into wraps even boldly stated.
[blockquote class=”{classname}”]…. aerogel absorbs sounds very well and has good impedance match with sound waves so it reflects very little sound. The structure of the Aerogel also creates a torturous path for the sound to travel though it once inside, resulting in a slowing down of the speed of sound from roughly 350 meters per second to around 100 meters per second. This reduction in speed reduces the amplitude of the sound.
The porous structure of aerogel will reduce the transmission of airborne sound waves through either reflection or absorption. Acoustic insulating properties can be particularly notable at lower frequencies (< 500Hz).[/blockquote]

Indeed a wonder substance you would think, so did we! At 200 quid a meter we set about obtaining a sample of this material and had it acoustically tested to prove if this was really the next big thing in acoustic treatment.

We’ve had the results back in and surprise surprise. An 8mm thick blanket of this stuff is pretty much transparent to sound frequencies below 500Hz talk about them being “particularly notable at lower frequencies (<500Hz)” . Even above 500Hz one only starts to see a significant change in absorption coefficient at 5000Hz where the aerogel’s absorption coefficient comes in at a decent .74.

It appears the huge discrepancy between the claimed and actual results is due to the method of converting the substance into a practical useable format. Aerogels are mainly available for sale as granules and wraps. The wrap which is what we tested basically constists of a fine polyester material infused with aerogel granules. The fact that the granules are not tightly packed in the material would theoretically have an effect on the absorption properties observed. Perharps in future solid aerogel panels will be readily available and maybe then would we have an acoustic product that is a practical solution for interior acoustics.

Conclusion
We carried out this test to answer the thousands of questions out there about the performance of aerogels and their application in acoustic treatment products for studios. The results show that if you are looking for a material to absorb high frequencies >5000Hz and have enough money in the bank then this is for you. Otherwise stay clear of the “Hype” (No pun intended) and leave this stuff for thermal insulation which we understand it is even more effective at. If the acoustic properties are anything to go by then we know what this means.

Find out more about aerogels and the nanotechnology used to create them here.

Getting The Boom Out Of Your Room

Getting The Boom Out Of Your Room

Perhaps the most frequently encountered challenge faced by the home music producer is a studio which sounds “boomy”. Poor acoustics which cause boomy rooms also present problems to the audiophile and the home cinema user and if untreated can create an unpleasant listening environment for  the user.
To understand how to treat the  boomy rooms it is important to understand what the causes are first and foremost and then proceed to adopt a suitable strategy coupled with acoustic treatment using high quality acoustic foam to tackle this low end frequency phenomenon. Successfully tackling room boom will greatly improve the quality and portability of your audio material.


The boomy sound is created by amplification of waves of various low end frequencies as they reinforce themselves at different points in your room.When these waves fit squarely in your room a standing wave is observed. A collection of frequencies that create standing waves in a room are called modes. The dimensions of your room will have an impact on the nature and frequencies at which these modes occur.Room modes would primarily occur in any plane where there parallel opposing walls as such would occur along the length, width and height of the room. To complicate things a bit more there are tangential and oblique standing waves are created by sound waves bouncing off a combination of walls and ceilings. Standing waves are more an issue in low frequencies because of the higher reverberant energy and the ability of the energy to persist or take longer to decay. Higher frequencies will decay quicker and as such by the time the reflected wave travels back to reinforce the direct or original wave the residual energy of the wave is very low. Higher frequencies however cause echoes and flutter echoes which will be addressed in a seperate article.

Taming the boom

It is important to realise that  any amount of acoustic treatment will not eliminate the boom created but will definitely go a long way in reducing its impact. As such before venturing out to invest in acoustic treatment we recommend you  follow these three simple steps

Placement

Make the most of the dimensions of your room. Placement of speaker and mixing position within your room can significantly reduce the significance of unwanted modes in your room. Always aim to have your speakers along the shorter wall in your room such that the speakers are firing the length of your room. Also, space allowing, move your speakers away from any corners and walls. Finally try and maintain symmetry in your layout this will  help balance out the sound image you receive. Read our article on basic acoustics to help with your placement.

Isolation

Ensure your monitors are adequately isolated from the surface they are resting on, this includes monitor stands. Working monitors sitting on a desk will invariably force the desk to resonate at its own natural frequency, this would create unwanted colouration in your room muddying the sound and reducing the quality of the sound in your room.A decent set of Monitor isolation pads placed under each speaker. Good isolation pads should be made of a material that is both flexible enough to absorb energy without suffering compression set and resilient enough to prevent the speaker from  swaying when in use.

Bass Trapping

Addressing placement and isolation can in some cases reduce a significant portion of the issues present in your room. Once you have sorted  the placement and isolation you can now start to invest in bass traps to further refine your rooms response. Bass traps come in various shapes, sizes and makes. What ever bass traps you settle for ensure you are getting products that have been adequately tested for absorption. A good indicator is the Weighted absoprtion coefficient and sound absorption class. Aim for Class A as this will  guarantee you are getting  a product that is effective at sound absorption.

Acoustic Foam Bass traps.

Properly designed acoustic foam bass traps are a very cost effective choice and recommended where ease of flexibility and cost are important. The design and quality of foam play a very important role in the performance of the bass traps.
There are manufacturers out there who will try to make you believe that any type of foam will deliver effective bass frequency absorption. These same foam converters will pass off low density matteress grade foam cut in attractive shapes as bass traps.  This is simply not the case! Upholstery foam used by comfy mattress manufacturers and converters is simply not effective in dampening low end frequency sound. What may seem like a cheap deal could ruin the acoustics in your room by providing uneven and excessive absorption.

Genuine acoustic foam suppliers and manufacturers will provide full test data and reports to support the performance of their products. Look out for these and ensure standards followed are recognised standards by appropriately accredited test labs. Otherwise any comparison will only result in comparing apples and oranges.

Adopting these three easy steps will go along way in helping you improve the sound  quality in your room. Good luck and please don’t hesitate to share with us pictures of your studio/ listening room.

Polyester foam

Polyester foam is a high grade acoustic foam that consists of a uniform open cell structure which lends the foam well for use in sound absorption. The millions of air pockets formed by the fine structure of this foam effectively absorb the energy of incident waves reducing the impact of these waves on your sound mix. The speciality nature of this foam means it is not an attractive material for foam converters to stock. Our manufacturers test  the air flow resistance of the material used in our eXtreme range to ensure structure is uniform.
Our Hyperflex range  of bass traps and panels ismade from polyester foam providing solid performance in your studio, lounge or home cinema. Our unique profile is accurately designed to delivery Deep Bass Controls in the lower sound frequency spectrum.

Setting Up Your Studio Acoustics – A beginner’s guide

Setting Up Your Studio AcousticsChances are you haven’t had much choice when it comes to deciding the structure of your studio. Like most urban artists you have probably ended up using a converted out building, garage or a room in your house as your studio.Nevertheless It is essential to understand how best to adapt the room, carefully position acoustic foam, and get your room sounding better.

With a bit of luck on your side you will have a room with one longer side. For purposes of this and other text we shall refer to this side as the length. The shorter wall of your room will be refered to as your width and the distance between the ceiling and the floor will be refered to as the height.

Step one  – Deciding where to place your mixing console

Determine which side of your room is the longest side. It is against the walls on one side of this axis that you will place your mixing console desk and chairs.


Step two – Choosing your sweet spot (The point where you will sit to evaluate your music mix)

Setting Up Your Studio Acoustics Step2

Now that you have decided where to place your mixing desk we will get on with deciding where your sweet spot will be. This will be the point where you will sit when evaluating your mix during the mixing phase. You may wonder why we have decided to position the chair before accurately placing the mixing table and speakers, this will become clear later.

The sweet spot is an area where the interferance from reflected waves and standing waves in your room are theoretically least therefore allowing you get an accurate image of the sound being produced by your speakers.

The dimensions of your room will almost innevitably have an impact on the nature of standing waves generated in your room. Put simply, standing waves are waves whose frequency is such that half of it’s wavelength is the lenth of your studio and whole multiples there of.

Therefore a room of  10m in length will create a standing wave a frequency where by half the wave length of the frequency is equal to the length of the room i.e.  a frequency of about 17Khz.  The human ear is generally regarded as capable of hearing sound between 20Hz and 20KHz as such this first standing wave will not be heard and for our purposes can be ignored. Reducing the wave length by 1/2 sequenctially gets us to the first standing wave of significance which has a wave length of 5m or frequency of about 68Hz, most of the bass energy of music can be assumed to exist around this frequency. Simplistically put this standing wave, bouncing off the walls of your room will exhibit maximum sound pressure at the following points along the length of your room, 0m, 2.5m,5m, 7.5m 10m or 0L, 0.25L,0.5L,0.75L & 1L where L is the length of your room. Because the wave causes maximum compression and hence maximum sound pressure at these points you should avoid placing your sweet spot at any of these points.

Similarly this standing wave will exhibit minimum sound pressure at the following points 0.125L,0.375L,0.625L & 0.875L you are probably getting the idea by now. Any one of these points is theortically ideal to place your chair however, practically you will need enough space between the wall and your chair to place the mixing desk so that your speakers are at a position equidistant from the wall and your ears. This point is normally at 0.375L. It is highly recommended that, space allowing, this is where you chair is placed.

Step Three- Refining the position of mixing desk ad speakers

Setting Up Your Studio Acoustics Step1

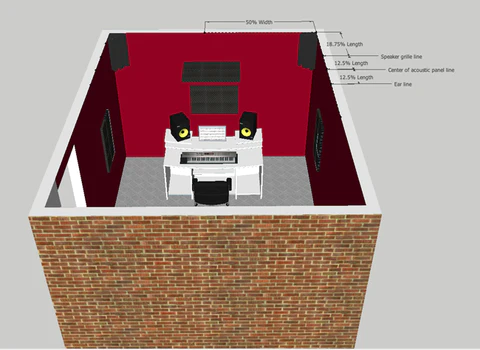
You probably figured this out in the previous paragraph, you will need to place your desk so that your speakers are equidistant from you and the wall when you are in your listening position or at your  sweet spot. Given that you have placed your chair at 0.375L then your speakers would be placed at  0.1875L along the length of your room.


Setting Up Your Studio Acoustics Step4

Step Four – Dealing with early reflections

Early reflections also called primary reflections are reflections that would theoretically reach your ears second quickest after the original sound has hit your ears. These reflections are generally created by sound waves bouncing off the wall on the back of your mixing console, the side walls, the floor and the ceiling. Treating these first reflections adequately will significantly improve the acoustics in your studio and hence the accuracy of your mix.

Now that we know who the culprits are the question is where should you place your acoustic foam panels. It as this point that some keen producers will panic and plaster the entire studio with acoustic foam panels. Poorly planned acoustic treament will instantly deading the sound in your studios by shortening the reverberation time.

The ideal location for your acoustic foam panels would be half the distance between your ears and the  speakers. We already know that your speakers are placed at 0.1875L and your sweet spot is  at .375L therefore an acoustic foam panel placed at 0.2813L will be slap bang in the middle of your ears and the speakers. An alternative way of determining this position is called the mirror method, where by sitting in your sweet spot you get a friend to hold a mirror against the wall first on the right hand side of your mixing desk and as the mirror is moved towards the back of the room a spot is identified where you can just see the right speaker reflection. This process is repeated on the left hand side to obtain the position of your side panels. The size of the acoustic foam panels is really a matter of choice but we recommend a 3×2 vertical panel of our 12″ tiles arranged so that the centre line is on the line that is at the centre of the distance between your ears and the speakers. In chosing what studio foam to use for your treatment be sure to purchase foam that has be tested with accompanying reports.

To deal with early reflections from the ceiling you would need to place a cluster of acoustic foam panels in our case a 3×2 horizontal array along the line joining the centres of the panels on the left and right wall.

This then leaves the front wall. As a minimum a horizontal panel of 3×2 acoustic foam tiles across the back of the mixing console at ear height will suffice however some people may go further and completely deaden the whole back wall, it all depends on how much you have to spend. You can then proceed to place another 3×2 horizontal panel along the back wall. Our 30x studio pack gives you just enough tiles to deal with early reflections in your room.

If you have a bit of cash to spare you can repeat the process for the back of your room mirroring exactly the same positioning at the front with the back however  depending on the length of your room this in the first instance isn’t absolutely necessary.

Setting Up Your Studio Acoustics Step5

Step Five – Dealing with modal points and low frequencies.

Low frequencies generally exist in the sub 500Hz region and a good idea of your room size will enable you better understand what frequencies are going to cause you problems. In our 10m length room we identified 68Hz being the first audible standing wave generated. Any mix created in such a room would almost certainly suffer from amplification at around this frequency and subsequent modes thereof. Unfortunately for us standing waves do not only exist in one plane but  in the horizontal, vertical , longitudinal, tangential and oblique planes but for simplicity in our studio setup we will ignore the oblique standing waves and focus on the other three.

Standing waves by their nature exhibit maximum sound pressure (Maximas) at the extreme ends of the room they are generated in, applying this to our room then you would have a high sound pressure level created where two walls meet (edges) and even more where three walls meet (Corners). It is for this reason that bass traps are introduced into corners of the room. The thickness of the bass traps helps absorb some of the modal energy generated by standing waves at the corners as well as distorting the dimensions of the room to affect the formation of standing waves.

Ideally you would want to place bass traps allong all edges top, bottom and sides as well as all corners, however the cost of doing this far outstrips the benefits in completely treating all corners. The minimum you will need is two corner traps for the top/bottom  left and top/bottom right and you can proceed to fill out other corners and edges as you get more money.

That’s it! Following these steps will go a long way in improving your studio acoustics and once done you should now be ready to mix.
Setting Up Your Studio Acoustics Final