Getting The Boom Out Of Your Room

Getting The Boom Out Of Your Room

Perhaps the most frequently encountered challenge faced by the home music producer is a studio which sounds “boomy”. Poor acoustics which cause boomy rooms also present problems to the audiophile and the home cinema user and if untreated can create an unpleasant listening environment for  the user.
To understand how to treat the  boomy rooms it is important to understand what the causes are first and foremost and then proceed to adopt a suitable strategy coupled with acoustic treatment using high quality acoustic foam to tackle this low end frequency phenomenon. Successfully tackling room boom will greatly improve the quality and portability of your audio material.


The boomy sound is created by amplification of waves of various low end frequencies as they reinforce themselves at different points in your room.When these waves fit squarely in your room a standing wave is observed. A collection of frequencies that create standing waves in a room are called modes. The dimensions of your room will have an impact on the nature and frequencies at which these modes occur.Room modes would primarily occur in any plane where there parallel opposing walls as such would occur along the length, width and height of the room. To complicate things a bit more there are tangential and oblique standing waves are created by sound waves bouncing off a combination of walls and ceilings. Standing waves are more an issue in low frequencies because of the higher reverberant energy and the ability of the energy to persist or take longer to decay. Higher frequencies will decay quicker and as such by the time the reflected wave travels back to reinforce the direct or original wave the residual energy of the wave is very low. Higher frequencies however cause echoes and flutter echoes which will be addressed in a seperate article.

Taming the boom

It is important to realise that  any amount of acoustic treatment will not eliminate the boom created but will definitely go a long way in reducing its impact. As such before venturing out to invest in acoustic treatment we recommend you  follow these three simple steps

Placement

Make the most of the dimensions of your room. Placement of speaker and mixing position within your room can significantly reduce the significance of unwanted modes in your room. Always aim to have your speakers along the shorter wall in your room such that the speakers are firing the length of your room. Also, space allowing, move your speakers away from any corners and walls. Finally try and maintain symmetry in your layout this will  help balance out the sound image you receive. Read our article on basic acoustics to help with your placement.

Isolation

Ensure your monitors are adequately isolated from the surface they are resting on, this includes monitor stands. Working monitors sitting on a desk will invariably force the desk to resonate at its own natural frequency, this would create unwanted colouration in your room muddying the sound and reducing the quality of the sound in your room.A decent set of Monitor isolation pads placed under each speaker. Good isolation pads should be made of a material that is both flexible enough to absorb energy without suffering compression set and resilient enough to prevent the speaker from  swaying when in use.

Bass Trapping

Addressing placement and isolation can in some cases reduce a significant portion of the issues present in your room. Once you have sorted  the placement and isolation you can now start to invest in bass traps to further refine your rooms response. Bass traps come in various shapes, sizes and makes. What ever bass traps you settle for ensure you are getting products that have been adequately tested for absorption. A good indicator is the Weighted absoprtion coefficient and sound absorption class. Aim for Class A as this will  guarantee you are getting  a product that is effective at sound absorption.

Acoustic Foam Bass traps.

Properly designed acoustic foam bass traps are a very cost effective choice and recommended where ease of flexibility and cost are important. The design and quality of foam play a very important role in the performance of the bass traps.
There are manufacturers out there who will try to make you believe that any type of foam will deliver effective bass frequency absorption. These same foam converters will pass off low density matteress grade foam cut in attractive shapes as bass traps.  This is simply not the case! Upholstery foam used by comfy mattress manufacturers and converters is simply not effective in dampening low end frequency sound. What may seem like a cheap deal could ruin the acoustics in your room by providing uneven and excessive absorption.

Genuine acoustic foam suppliers and manufacturers will provide full test data and reports to support the performance of their products. Look out for these and ensure standards followed are recognised standards by appropriately accredited test labs. Otherwise any comparison will only result in comparing apples and oranges.

Adopting these three easy steps will go along way in helping you improve the sound  quality in your room. Good luck and please don’t hesitate to share with us pictures of your studio/ listening room.

Polyester foam

Polyester foam is a high grade acoustic foam that consists of a uniform open cell structure which lends the foam well for use in sound absorption. The millions of air pockets formed by the fine structure of this foam effectively absorb the energy of incident waves reducing the impact of these waves on your sound mix. The speciality nature of this foam means it is not an attractive material for foam converters to stock. Our manufacturers test  the air flow resistance of the material used in our eXtreme range to ensure structure is uniform.
Our Hyperflex range  of bass traps and panels ismade from polyester foam providing solid performance in your studio, lounge or home cinema. Our unique profile is accurately designed to delivery Deep Bass Controls in the lower sound frequency spectrum.

Setting Up Your Studio Acoustics – A beginner’s guide

Setting Up Your Studio AcousticsChances are you haven’t had much choice when it comes to deciding the structure of your studio. Like most urban artists you have probably ended up using a converted out building, garage or a room in your house as your studio.Nevertheless It is essential to understand how best to adapt the room, carefully position acoustic foam, and get your room sounding better.

With a bit of luck on your side you will have a room with one longer side. For purposes of this and other text we shall refer to this side as the length. The shorter wall of your room will be refered to as your width and the distance between the ceiling and the floor will be refered to as the height.

Step one  – Deciding where to place your mixing console

Determine which side of your room is the longest side. It is against the walls on one side of this axis that you will place your mixing console desk and chairs.


Step two – Choosing your sweet spot (The point where you will sit to evaluate your music mix)

Setting Up Your Studio Acoustics Step2

Now that you have decided where to place your mixing desk we will get on with deciding where your sweet spot will be. This will be the point where you will sit when evaluating your mix during the mixing phase. You may wonder why we have decided to position the chair before accurately placing the mixing table and speakers, this will become clear later.

The sweet spot is an area where the interferance from reflected waves and standing waves in your room are theoretically least therefore allowing you get an accurate image of the sound being produced by your speakers.

The dimensions of your room will almost innevitably have an impact on the nature of standing waves generated in your room. Put simply, standing waves are waves whose frequency is such that half of it’s wavelength is the lenth of your studio and whole multiples there of.

Therefore a room of  10m in length will create a standing wave a frequency where by half the wave length of the frequency is equal to the length of the room i.e.  a frequency of about 17Khz.  The human ear is generally regarded as capable of hearing sound between 20Hz and 20KHz as such this first standing wave will not be heard and for our purposes can be ignored. Reducing the wave length by 1/2 sequenctially gets us to the first standing wave of significance which has a wave length of 5m or frequency of about 68Hz, most of the bass energy of music can be assumed to exist around this frequency. Simplistically put this standing wave, bouncing off the walls of your room will exhibit maximum sound pressure at the following points along the length of your room, 0m, 2.5m,5m, 7.5m 10m or 0L, 0.25L,0.5L,0.75L & 1L where L is the length of your room. Because the wave causes maximum compression and hence maximum sound pressure at these points you should avoid placing your sweet spot at any of these points.

Similarly this standing wave will exhibit minimum sound pressure at the following points 0.125L,0.375L,0.625L & 0.875L you are probably getting the idea by now. Any one of these points is theortically ideal to place your chair however, practically you will need enough space between the wall and your chair to place the mixing desk so that your speakers are at a position equidistant from the wall and your ears. This point is normally at 0.375L. It is highly recommended that, space allowing, this is where you chair is placed.

Step Three- Refining the position of mixing desk ad speakers

Setting Up Your Studio Acoustics Step1

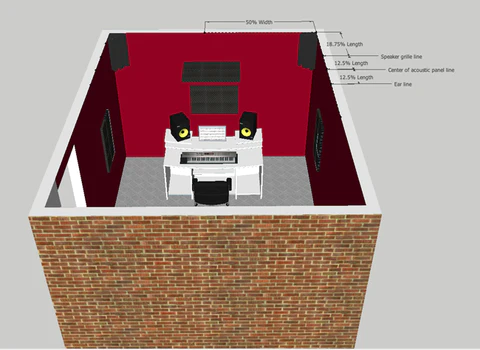
You probably figured this out in the previous paragraph, you will need to place your desk so that your speakers are equidistant from you and the wall when you are in your listening position or at your  sweet spot. Given that you have placed your chair at 0.375L then your speakers would be placed at  0.1875L along the length of your room.


Setting Up Your Studio Acoustics Step4

Step Four – Dealing with early reflections

Early reflections also called primary reflections are reflections that would theoretically reach your ears second quickest after the original sound has hit your ears. These reflections are generally created by sound waves bouncing off the wall on the back of your mixing console, the side walls, the floor and the ceiling. Treating these first reflections adequately will significantly improve the acoustics in your studio and hence the accuracy of your mix.

Now that we know who the culprits are the question is where should you place your acoustic foam panels. It as this point that some keen producers will panic and plaster the entire studio with acoustic foam panels. Poorly planned acoustic treament will instantly deading the sound in your studios by shortening the reverberation time.

The ideal location for your acoustic foam panels would be half the distance between your ears and the  speakers. We already know that your speakers are placed at 0.1875L and your sweet spot is  at .375L therefore an acoustic foam panel placed at 0.2813L will be slap bang in the middle of your ears and the speakers. An alternative way of determining this position is called the mirror method, where by sitting in your sweet spot you get a friend to hold a mirror against the wall first on the right hand side of your mixing desk and as the mirror is moved towards the back of the room a spot is identified where you can just see the right speaker reflection. This process is repeated on the left hand side to obtain the position of your side panels. The size of the acoustic foam panels is really a matter of choice but we recommend a 3×2 vertical panel of our 12″ tiles arranged so that the centre line is on the line that is at the centre of the distance between your ears and the speakers. In chosing what studio foam to use for your treatment be sure to purchase foam that has be tested with accompanying reports.

To deal with early reflections from the ceiling you would need to place a cluster of acoustic foam panels in our case a 3×2 horizontal array along the line joining the centres of the panels on the left and right wall.

This then leaves the front wall. As a minimum a horizontal panel of 3×2 acoustic foam tiles across the back of the mixing console at ear height will suffice however some people may go further and completely deaden the whole back wall, it all depends on how much you have to spend. You can then proceed to place another 3×2 horizontal panel along the back wall. Our 30x studio pack gives you just enough tiles to deal with early reflections in your room.

If you have a bit of cash to spare you can repeat the process for the back of your room mirroring exactly the same positioning at the front with the back however  depending on the length of your room this in the first instance isn’t absolutely necessary.

Setting Up Your Studio Acoustics Step5

Step Five – Dealing with modal points and low frequencies.

Low frequencies generally exist in the sub 500Hz region and a good idea of your room size will enable you better understand what frequencies are going to cause you problems. In our 10m length room we identified 68Hz being the first audible standing wave generated. Any mix created in such a room would almost certainly suffer from amplification at around this frequency and subsequent modes thereof. Unfortunately for us standing waves do not only exist in one plane but  in the horizontal, vertical , longitudinal, tangential and oblique planes but for simplicity in our studio setup we will ignore the oblique standing waves and focus on the other three.

Standing waves by their nature exhibit maximum sound pressure (Maximas) at the extreme ends of the room they are generated in, applying this to our room then you would have a high sound pressure level created where two walls meet (edges) and even more where three walls meet (Corners). It is for this reason that bass traps are introduced into corners of the room. The thickness of the bass traps helps absorb some of the modal energy generated by standing waves at the corners as well as distorting the dimensions of the room to affect the formation of standing waves.

Ideally you would want to place bass traps allong all edges top, bottom and sides as well as all corners, however the cost of doing this far outstrips the benefits in completely treating all corners. The minimum you will need is two corner traps for the top/bottom  left and top/bottom right and you can proceed to fill out other corners and edges as you get more money.

That’s it! Following these steps will go a long way in improving your studio acoustics and once done you should now be ready to mix.
Setting Up Your Studio Acoustics Final

Acoustic treatment for music practice rooms and academies

With the lockdown finally coming to an end and social distancing restrictions being consigned to the bin of history, a lot of practice rooms and music academies are dusting off the cobwebs and giving their spaces a “summer clean” as they get ready to welcome back students for face-to-face lessons.

We know the last 16 or so months have been extremely difficult for venue owners and people like yourselves who run practice room facilities, which is why we are reaching out to offer you an exclusive trade discount on all our products. We hope this will go some way to helping your get back on your feet as you open up your venue to live users once more.

Pro-coustix is the UK’s most comprehensive range of acoustic treatment products with products ranging from acoustic treatment panels in various patterns, speaker isolation pads for improving monitor speaker response, through to mounting solutions and spray adhesive for mounting acoustic tiles on walls and ceilings. We pride ourselves in offering a one stop brand for quality products backed by unrivalled expertise in the acoustic treatment sector.

Our journey with you doesn’t end with you purchasing our great products, but ensuring you make the most of the products you purchase. Our friendly technical team is available to help you with treatment recommendations, product options and we will provide placement diagrams to ensure you get the best out of our products.

If you are looking for to refresh your acoustic treatment or looking for exciting, high performing acoustic treatment to make your space both better acoustically and enticing aesthetically, then you have come to the right place. Check out our store and browse through our exclusive pattern designs.

We are a manufacturer not a reseller or retailer, all our products are manufactured at our factory in Hemel Hempstead. We run a modern and very lean operation allowing us offer high quality uncompressed foam products at very competitive prices.

Why not speak to us today!

Could your music teaching room do with an upgrade?

We were approached by The Music Practise to improve the acoustics in one of their piano rooms, as the sound was “bright”, “tinny” and reverberant. It was also affecting the quality of audio capture when, during lockdown, lessons were being held over zoom.

The client was keen to ensure that the solution we provided not only achieved the goal of improved acoustics but also was aesthetically pleasing. Whilst acoustic foam is a great acoustic absorber the grey colour can be a bit dull indoors especially in rooms where the intention is not to have an industrial audio feel.

We recommended our Diffuserflex acoustic diffuser panels and modelled the minimum quantity required for the room. The panels were delivered next day, along with our purpose built acoustic panel impalers, for secure removable mounting.

The results were amazing, the resulting acoustics in the room were greatly improved with improved absorption and broadening of the upper mids and high frequencies. This has resulted in a much more pleasant piano playing atmosphere reducing player fatigue and enhancing the overall learning experience. The real wood walnut veneered finish on the panels gives it a classy, high-end touch, resulting in a great music space. 

Are you struggling to get good sound out of your space? Talk to us today and let’s get you on your way to better sound!

Music Rooms Listening Acoustic Treatment Music Room Acoustic Treatment 

We are now on 100% renewable energy

We are very excited to become one of the first acoustic treatment manufacturers in the UK to produce acoustic foam in a factory that is run on 100% renewable energy.

We have always been keen to ensure that as we grow we keep our fingers on the pulse of sustainability because it is what we believe in. We scoured the market for renewable energy suppliers and were only too pleased to take on our supply ocntract with Opus.

You can now rest assured that the foam in your studio, music room or home cinema was produced sustainbly and you are helping to contribute towards a  greener world.

In addition to renewable energy all our handling equipment is electric and we’ve had our warehouse and office lighting  upgraded to  LED lights. This means we are not only using renewable energy but using it sparingly.

We are in the final stages of sourcing a recycling partner for our foam and have reduced our polythene bag usage by 98% in the last year!

If you are looking for acoustic treatment that doesn’t cost the earth you are in the right place.

Hello European Union!

We are delighted to announce that due to the change in VAT regulations and requirements for sellers on online market places we have turned on our key listings on Amazon in the following countries;

Customers from these countries wishing to purchase items from us that are less that 150 Euros can do so straigh away of the relative websites will be able to receive their goods  without having to pay additional duty and VAT.

We hope to be able to offer the service direct from our website however are still in the process of setting up all the legal requirements.

We welcome back our customers from mainland Europe, we missed you!

Win an Ultraflex Studio Pack

We are adding to the footbally frenzy by giving two lucky followers a chance to wina  studio pack each.

All you need to do for a chance to win is 

  • Head over to our instagram page @procoustix
  • Make sure you are following us
  • Comment with you rprediction for the wednesday game of England Vs Denmark 07/07/2021
  • Tag two friends to your comment.

That’s it! All correct predictions will be ientered into a  raw for th estudio packs after the match on Wednesday.

This competition is only open to followers in the UK due to postage costs. Shipping to non mainland UK destinations may incur a shipping charge.

Good luck!

Consult your crystal globe and get predicting.

Why is UK manufactured acoustic foam not black?

Having operated in the acoustic foam sector for over 10 years this is something we get quite a lot of questions about.

Unfortunately in recent years the UK market has been flooded with vaccum packed black, compressed foam from China and the far east which is sold under different brands. 

Acoustic Foam in UK and Europe is manufactured by a handful of manfacturers who have to comply with very strict fire and material safety standards. The foam that is used in acoustic treatment has to be combustion modified to at least Crib V in the UK or UL94 HF1 in the US.

This fire rating means the foams will not catch fire if exposed to a burning match, something that would be catastrophic for the end user were it to occur.

In order to make foams fire retardant, a significant amount of fire retardant is applied to the foam mixture which creates a combustion modified foam.

The fire retardants however, also react with the pigments creating variations in colour. Most notably any black pigment used to colour foam blocks will become grey or dark grey depending on the grade due to the reaction of the pigments and the foam. This is the reason why there is no European or UK manufacturer able to produce and supply black acoustic grade foam.

Further more, foam in the European markets, unless for bespoke applications is visually graded using colour. This helps converters and manufacturers identify simply by looking what grade a particular foam block is. Grey has become the accepted colour for  acoustic foam with darker greys reflecting higher density. Black foam can be produced in sheets by impregnating carbon into the foam this makes his fireproof. This specialist foam has a very strong chemical smell and isn’t designed for panels that are visible but rather hidden behind machinery parts and car hoods. This foam also isn’t available in blocks to be cut into acoustic panels using CNC machinery.

It is possible however, to get black “acoustic” foam from the far east being sold on ebay and amazon market. However, user feedback has shown that these are of lower density, have very strong toxic smell and are not tested to UK/EU fire and safety guidlines.

Don’t put your life and those of your loved ones at risk. Buy foam manufactured and tested in Britain for peace of mind.

Pro-coustix Upgrades Its CNC cutting capability

We are pleased to announce that after quite a lot of testing and preparation our brand new CNC  horizontal contour cutting machine is now fully operational.

This is one of the most advanced CNC machines in the UK enabling us deliver some of the most complex and accurate cuts in the industry.

Unlike furniture and matteress manufacturers who rely on high through put and use continuous blade machines our machine uses a reciprocrating blade with a fine pitch and witdth. This blade enables us to cut with a high level of accuracy which is unachievable with continuous blade machines.

Our capability now allows us to develop shapes that were once the preserve of a few and introduce to customers the exclusive patterns and designs that we have become well known for.

If you are looking for mass produced acoustic treatment products look no further we can help you produce any quantity you require. 


Say hello to Amazon Pay

As part of our drive to ensure a seamless and effortless shopping experience we are pleased to welcome Amazon pay to our payment options.

Amazon pay means that amazon customers can shop from our website and pay securely using your payment details stored on Amazon. By shopping directly with us you are able to benefit for our express next day delivery service for orders received before 2pm and get first pick access to any web exclusive offers we run.

To pay with Amazon pay please complete your shopping as normal and when you get to the check out choose Amazon pay from the payment options available.

If you get stuck or need any help do not hesitate to chat with us or contact us on  01442 889 294.