 Chances are you haven’t had much choice when it comes to deciding the structure of your studio. Like most urban artists you have probably ended up using a converted out building, garage or a room in your house as your studio.Nevertheless It is essential to understand how best to adapt the room, carefully position acoustic foam, and get your room sounding better.
With a bit of luck on your side you will have a room with one longer side. For purposes of this and other text we shall refer to this side as the length. The shorter wall of your room will be refered to as your width and the distance between the ceiling and the floor will be refered to as the height.
Step one – Deciding where to place your mixing console
Determine which side of your room is the longest side. It is against the walls on one side of this axis that you will place your mixing console desk and chairs.
Step two – Choosing your sweet spot (The point where you will sit to evaluate your music mix)
Now that you have decided where to place your mixing desk we will get on with deciding where your sweet spot will be. This will be the point where you will sit when evaluating your mix during the mixing phase. You may wonder why we have decided to position the chair before accurately placing the mixing table and speakers, this will become clear later.
The sweet spot is an area where the interferance from reflected waves and standing waves in your room are theoretically least therefore allowing you get an accurate image of the sound being produced by your speakers.
The dimensions of your room will almost innevitably have an impact on the nature of standing waves generated in your room. Put simply, standing waves are waves whose frequency is such that half of it’s wavelength is the lenth of your studio and whole multiples there of.
Therefore a room of 10m in length will create a standing wave a frequency where by half the wave length of the frequency is equal to the length of the room i.e. a frequency of about 17Khz. The human ear is generally regarded as capable of hearing sound between 20Hz and 20KHz as such this first standing wave will not be heard and for our purposes can be ignored. Reducing the wave length by 1/2 sequenctially gets us to the first standing wave of significance which has a wave length of 5m or frequency of about 68Hz, most of the bass energy of music can be assumed to exist around this frequency. Simplistically put this standing wave, bouncing off the walls of your room will exhibit maximum sound pressure at the following points along the length of your room, 0m, 2.5m,5m, 7.5m 10m or 0L, 0.25L,0.5L,0.75L & 1L where L is the length of your room. Because the wave causes maximum compression and hence maximum sound pressure at these points you should avoid placing your sweet spot at any of these points.
Similarly this standing wave will exhibit minimum sound pressure at the following points 0.125L,0.375L,0.625L & 0.875L you are probably getting the idea by now. Any one of these points is theortically ideal to place your chair however, practically you will need enough space between the wall and your chair to place the mixing desk so that your speakers are at a position equidistant from the wall and your ears. This point is normally at 0.375L. It is highly recommended that, space allowing, this is where you chair is placed.
Step Three- Refining the position of mixing desk ad speakers
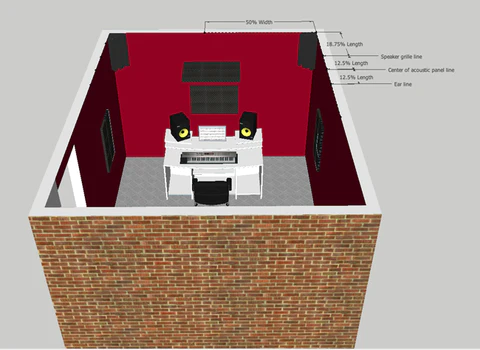
You probably figured this out in the previous paragraph, you will need to place your desk so that your speakers are equidistant from you and the wall when you are in your listening position or at your sweet spot. Given that you have placed your chair at 0.375L then your speakers would be placed at 0.1875L along the length of your room.
Step Four – Dealing with early reflections
Early reflections also called primary reflections are reflections that would theoretically reach your ears second quickest after the original sound has hit your ears. These reflections are generally created by sound waves bouncing off the wall on the back of your mixing console, the side walls, the floor and the ceiling. Treating these first reflections adequately will significantly improve the acoustics in your studio and hence the accuracy of your mix.
Now that we know who the culprits are the question is where should you place your acoustic foam panels. It as this point that some keen producers will panic and plaster the entire studio with acoustic foam panels. Poorly planned acoustic treament will instantly deading the sound in your studios by shortening the reverberation time.
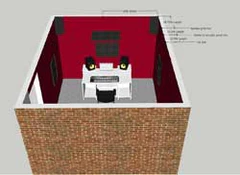
The ideal location for your acoustic foam panels would be half the distance between your ears and the speakers. We already know that your speakers are placed at 0.1875L and your sweet spot is at .375L therefore an acoustic foam panel placed at 0.2813L will be slap bang in the middle of your ears and the speakers. An alternative way of determining this position is called the mirror method, where by sitting in your sweet spot you get a friend to hold a mirror against the wall first on the right hand side of your mixing desk and as the mirror is moved towards the back of the room a spot is identified where you can just see the right speaker reflection. This process is repeated on the left hand side to obtain the position of your side panels. The size of the acoustic foam panels is really a matter of choice but we recommend a 3×2 vertical panel of our 12″ tiles arranged so that the centre line is on the line that is at the centre of the distance between your ears and the speakers. In chosing what studio foam to use for your treatment be sure to purchase foam that has be tested with accompanying reports.
To deal with early reflections from the ceiling you would need to place a cluster of acoustic foam panels in our case a 3×2 horizontal array along the line joining the centres of the panels on the left and right wall.
This then leaves the front wall. As a minimum a horizontal panel of 3×2 acoustic foam tiles across the back of the mixing console at ear height will suffice however some people may go further and completely deaden the whole back wall, it all depends on how much you have to spend. You can then proceed to place another 3×2 horizontal panel along the back wall. Our 30x studio pack gives you just enough tiles to deal with early reflections in your room.
If you have a bit of cash to spare you can repeat the process for the back of your room mirroring exactly the same positioning at the front with the back however depending on the length of your room this in the first instance isn’t absolutely necessary.
Step Five – Dealing with modal points and low frequencies.
Low frequencies generally exist in the sub 500Hz region and a good idea of your room size will enable you better understand what frequencies are going to cause you problems. In our 10m length room we identified 68Hz being the first audible standing wave generated. Any mix created in such a room would almost certainly suffer from amplification at around this frequency and subsequent modes thereof. Unfortunately for us standing waves do not only exist in one plane but in the horizontal, vertical , longitudinal, tangential and oblique planes but for simplicity in our studio setup we will ignore the oblique standing waves and focus on the other three.
Standing waves by their nature exhibit maximum sound pressure (Maximas) at the extreme ends of the room they are generated in, applying this to our room then you would have a high sound pressure level created where two walls meet (edges) and even more where three walls meet (Corners). It is for this reason that bass traps are introduced into corners of the room. The thickness of the bass traps helps absorb some of the modal energy generated by standing waves at the corners as well as distorting the dimensions of the room to affect the formation of standing waves.
Ideally you would want to place bass traps allong all edges top, bottom and sides as well as all corners, however the cost of doing this far outstrips the benefits in completely treating all corners. The minimum you will need is two corner traps for the top/bottom left and top/bottom right and you can proceed to fill out other corners and edges as you get more money.
That’s it! Following these steps will go a long way in improving your studio acoustics and once done you should now be ready to mix.
